Description
Hard-Numbers: Technical Specifications
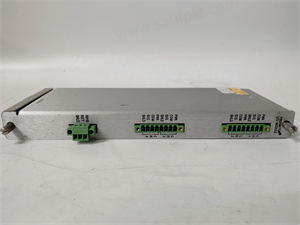
- Feedback Inputs: 2 tachometer inputs (AC/DC tach), 3 current transformer (CT) inputs
- Tachometer Input Range: 0-100 VAC (typical), 0-200 VDC (DC tach optional)
- CT Input Range: 0-5 A secondary, compatible with standard 5A CTs
- Output Signals: Digital feedback to drive controller via backplane, 4-20 mA analog output optional
- Isolation: Channel-to-channel 1500V RMS, backplane isolation 500V RMS
- Sampling Rate: 2 kHz per channel (high-speed feedback)
- Accuracy: ±0.1% of reading (speed), ±0.5% of reading (current)
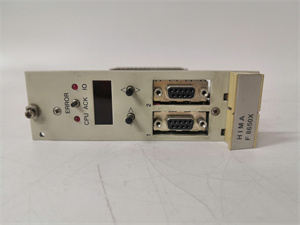
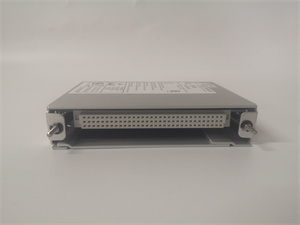
- Backplane Interface: VME-style 96-pin DIN connector
- Power Requirements: +5 VDC @ 2.5 A, +15 VDC @ 0.8 A
- Operating Temperature: 0°C to 55°C (32°F to 131°F)
- LED Indicators: Power, Tachometer Status (2), CT Status (3), Fault
- Diagnostic Capabilities: On-board diagnostics, signal loss detection, overspeed detection
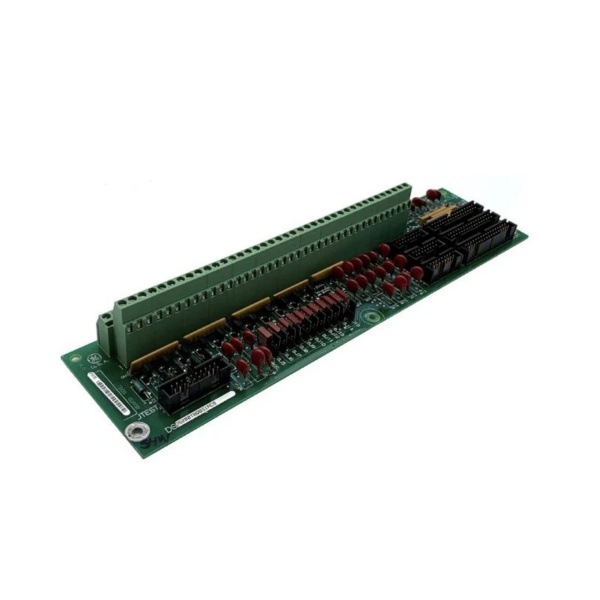
- Terminal Block: Removable screw terminal for field wiring
The Real-World Problem It Solves
DC drive control requires precise speed and current feedback for regulation. The DS200DCFBG1ALC provides high-speed feedback conversion, enabling accurate motor control and protection.
Where you’ll typically find it:
- GE DC motor drive systems
- Turbine auxiliary drive controls
- Generator excitation systems
- Rolling mill and conveyor drives
Bottom line: High-precision feedback conversion for DC drive control.
Hardware Architecture & Under-the-Hood Logic
The DS200DCFBG1ALC converts tachometer and CT signals to digital feedback values. Tachometer signals (AC or DC) are conditioned and digitized via high-speed ADC. CT signals are converted to voltage via shunt resistors and digitized. The board provides isolated digital feedback to the drive controller via the VME backplane. Overspeed and signal loss detection protect the drive system.
Signal flow:
- Tachometer input received (AC or DC tach)
- Tach signal conditioned and filtered
- ADC converts tach signal to digital speed value
- CT secondary current converted to voltage via shunt
- CT voltage digitized via ADC
- Microcontroller processes feedback data
- Digital feedback transmitted to drive controller via backplane
- Overspeed and signal loss detection active
- LEDs indicate status and fault conditions
Field Service Pitfalls: What Rookies Get Wrong
Tachometer polarity reversed causes negative speed readingDC tach polarity is critical. I’ve seen technicians wiring DC tach backwards, causing the drive controller to read negative speed at full forward rotation.
- Field Rule: Verify tachometer polarity before wiring. For DC tachometers, the red lead is positive (+), black is negative (-). Test rotation direction—if motor moves forward but controller reads negative speed, reverse the tach leads. Document polarity and test results. For AC tachs, polarity is not critical but ensure the tach matches the drive configuration.
CT ratio mismatch causes current measurement errorsWrong CT ratio throws off calibration. I’ve seen technicians installing 2000:5 CTs while configuring for 1000:5, causing the drive to read double the actual current.
- Field Rule: Verify CT ratio matches drive configuration. Standard CTs are 5A secondary. Configure the drive board for the primary-to-secondary ratio (e.g., 1000:5). Test with a known load—if reading is off by a factor of 2, check CT ratio. Document CT ratio and configuration. Never mix CTs with different ratios on the same feedback board without reconfiguration.
Ground loops on tachometer signal cause erratic readingsTach signals are low-level and noise-sensitive. I’ve seen tach cables run alongside power cables, causing speed feedback oscillation and drive instability.
- Field Rule: Use shielded twisted pair for tachometer signals. Ground the shield at the drive cabinet end only. Maintain minimum 12-inch separation from power cables. For long runs (>100 ft), use differential tach inputs if available. Test tach signal with an oscilloscope—look for clean sine wave (AC tach) or stable DC (DC tach). Document routing and test results.
Forgotten to configure overspeed setpoint causes hazardous overspeedOverspeed protection defaults disabled on some boards. I’ve seen technicians failing to configure overspeed setpoint, allowing the motor to run beyond safe limits.
- Field Rule: Configure overspeed setpoint to 10-15% above rated speed during commissioning. Test overspeed protection by gradually increasing speed reference—drive should trip at configured setpoint. Document overspeed setpoint and test date. Never disable overspeed protection for temporary testing—use a safe test procedure instead.
CT secondary open circuit causes hazardous voltageOpen CT secondary creates dangerous high voltage. I’ve seen technicians disconnecting CT wiring while the drive is energized, causing arcing and equipment damage.
- Field Rule: Never open-circuit a CT while primary current is flowing. Short the CT secondary terminals together before disconnecting. Use a shorting block or jumper wire. Install CTs with a shorting switch for maintenance access. De-energize the drive if shorting is not possible. Document CT shorting procedure and train all technicians.
Signal loss detection misconfiguration causes nuisance tripsSignal loss threshold too sensitive trips on normal transients. I’ve seen technicians setting signal loss detection at 5% threshold, causing trips during normal acceleration.
- Field Rule: Configure signal loss threshold to 20-30% of nominal value. Test signal loss detection by disconnecting the tach or CT—drive should trip within 100-200 ms. Document threshold settings and test results. For variable speed applications, ensure the threshold accounts for low-speed operation.
Incorrect filtering causes slow response or noiseFilter bandwidth too narrow slows response; too wide allows noise. I’ve seen technicians using 10 Hz filtering on fast response applications, causing overshoot and instability.
- Field Rule: Set filter bandwidth appropriate to your application. For fast response (e.g., positioning drives), use 50-100 Hz filtering. For standard applications, 20-50 Hz is typical. Test response time with a step input—too slow indicates filter bandwidth too narrow. Document filter settings and response time tests.
Hot-swapping feedback wiring while powered damages the boardLive wiring creates transients that blow inputs. I’ve seen technicians adding or removing tach or CT wires while the drive is running, causing input damage.
- Field Rule: Follow proper lockout/tagout procedures before modifying feedback wiring. De-energize the drive and verify zero energy state. For CTs, short the secondary before disconnecting. Never hot-swap tachometer or CT wiring. Document LOTO procedures and train all technicians.
Forgotten to verify calibration after replacement causes control errorsFeedback calibration drifts over time. I’ve seen technicians installing replacement boards without verifying calibration, resulting in speed errors up to 5%.
- Field Rule: Perform calibration verification after board replacement using a known speed source (calibrated tach simulator or reference motor). For CT feedback, apply a known current and verify measurement accuracy. Document calibration points and measured values. Apply correction factors if readings deviate from spec. Maintain calibration records per plant QA requirements.
Ignoring fault LED causes missed protection issuesFault LED indicates board or protection failure. I’ve seen technicians ignoring a flashing Fault LED, discovering the problem only after a catastrophic motor failure.
- Field Rule: Monitor Fault LED during operation. Any flashing or solid-on Fault LED indicates a problem—investigate immediately. Use diagnostic software to read fault codes. Common faults: signal loss, overspeed detection, feedback mismatch. Document fault codes and corrective actions. Replace boards with recurring unexplained faults.
Commercial Availability & Pricing Note
Please note: The listed price is for reference only and is not binding. Final pricing and terms are subject to negotiation based on current market conditions and availability.